NukeLink ComfyUI Extension

July 16, 2026

videoprojects

There’s a lot wrong with ComfyUI. It just really doesn’t ever feel like it was made with professional VFX work in mind. A lot of this feeling comes from people making AI slop or doing amateur level work with ComfyUI, often working from mov’s or mp4’s, and not with EXRs or image sequences that eventually will have to go into other professional software. This feeling shows up everywhere, in small mannerisms in certain nodes or in workflows that just don't hold up when you're trying to use them for real production work. Plenty of tools try to fit the need, but nothing quite feels true, and everything ends up feeling a little clunky. The tools I've grown used to get close, but still seem to fall short.
NukeLink Read node
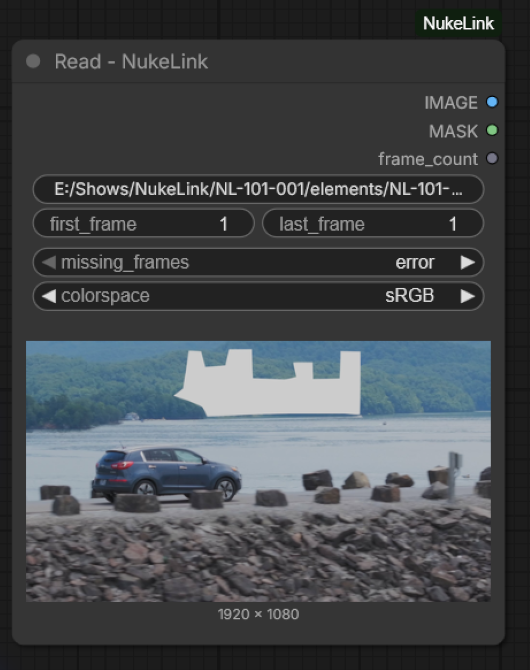
The NukeLink Read node

ComfyUI-VideoHelperSuite has a fantastic preview system that renders sequences and images right onto the node, but a lot like other ComfyUI tools, it doesn't take VFX seriously, with no real EXR support, and widgets like "frame load" that clearly weren't built with a compositor in mind. Sumit Chatterjee's Nuke nodes for ComfyUI are closer. Marvelously Nuke inspired Read and Write nodes with proper colorspace handling, but they still aren’t built the way I actually want to work. Regardless, I also hate copying file paths back and forth by hand. Pulling a path out of Nuke and into a VHS node usually means editing it since VHS wants a folder, not a file path. And getting from ComfyUI to file explorer to actually view what you generated has no easy solution where in Nuke theres a simple python script that you can bind to a hotkey. Even concatenating save paths for a Save Image node that matches my pipeline structure is more annoying than it should be.

At first, it was incredibly simple to set up a python script from Nuke that would copy a prefilled Sumit-Nuke Read node or a VHS node to your clipboard, that you could paste into ComfyUI. Even a single right-click menu in ComfyUI that copies the file path straight into a Nuke Read node syntax was easy. But at the end of the day, a solution like that isn’t really a solution, its just a stopgap.

NukeLink connects Nuke and a local ComfyUI session so image sequences and single images can move between them directly. On the Nuke side it's a Python script with its own listener port, so ComfyUI can send nodes back through. ComfyUI receives nodes through a route added to its existing local server, so no separate app or port to manage. Sending a node over and getting one back both happen instantly.

Select Read nodes in Nuke, tab search or right-click, and hit "Send to ComfyUI," The file path, colorspace, frame range, and missing frames mode all come into ComfyUI as a new NukeLink Read node. No copying, no retyping. Anyone who remembers that old python script for sending Read nodes from Nuke to Mocha Pro will know exactly what I was going for.
NukeLink Path Builder node
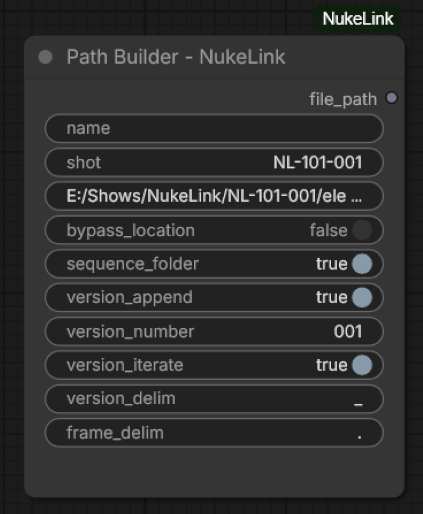
NukeLink's Path Builder node

A Path Builder node also drops onto the ComfyUI canvas alongside it, already filled in with your output location and shot name, pulled from your Nuke script's filename or a pipeline environment variable. When you've got a result you like in ComfyUI, right-click the NukeLink Write node, hit "Send to Nuke," and it drops into Nuke as a Read node, ready to go. Both Read and Write nodes have real-time previews built in, with playback controls in the right-click menu, similar to what ComfyUI-VHS does, but with a ton more image support and in a package friendly to Nuke artists.
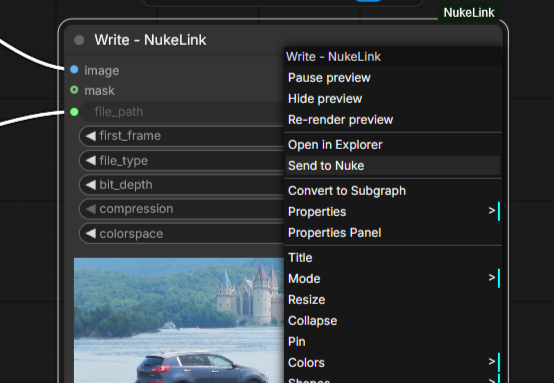
NukeLink's right click menu

But what a bitch and a half getting it all working was. I would’ve never thought having two widgets side by side in one row would’ve been so frustrating. Getting first_frame and last_frame to sit on the same row of the ComfyUI Read node, the way a real Nuke Read node has them, took about three days of trial and error. It sounds small, and it sounds stupid, but I think its simple things like this that really make it more user friendly for Nuke artists. Making those fake custom widgets actually behave like a native ComfyUI widgets was one of the biggest hurdles in this whole project.
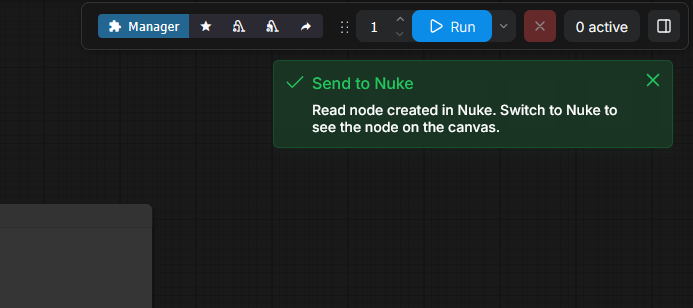
NukeLink confirmation notification in ComfyUI

One of the hardest problems was probably getting Send to Nuke and Open in Explorer to work reliably regardless if anything had actually been executed yet. Getting a variable properly tracked, then getting the node to climb back up the chain correctly to resolve the right file path, even in cases where nothing downstream had run. That took about two days on its own, with things breaking on and off all the time.

And then there was alpha. I must have gone through 4 Claude chats that kept premultiplying the RGB against alpha. Anyone who uses Nuke or even anyone in professional VFX knows, alpha is it’s own separate thing. It should never be considered just the “transparency” of the image. It’s a whole separate channel that can be used or not used for many other things. Claude never got it, I had to force it’s hand at the end, just taking code snippets and working in multiple chats to get it to do just what I wanted it to do.

Claude use was pretty heavy on this one, no Claude Code, no agent writing code on its own, all just off the shelf Claude chat. Every line went through me copying and pasting and reviewing. Writing Python code was familiar territory, but the JavaScript and tensor stuff was not. I'm on and off learning JavaScript right now, but it's not something I touch every day or need to in VFX. I could still read the code, and follow what was going on, and hold Claude accountable to what I actually wanted, but a fair amount of the code was over my head at times.

But the actual judgment calls, what a real Read node in ComfyUI should feel like, how a compositor expects a node to work, why alpha can't be treated like how Photoshop or AfterEffects treats it, why a stopgap wasn't going to cut it, it all came from trying to build a tool that would be genuinely useful to artists.
Check it out on GitHub!

DBFluxFill: An AI Inpainting Gizmo

April 27, 2026

videoprojects

I think generative fill is one of the few AI tools that's actually useful in everyday VFX tasks. The kind of thing that would have taken me an hour to paint out you can now knock out in a few minutes. So when I started messing around with Flux Fill in ComfyUI, the obvious question was why am I leaving Nuke to do this?

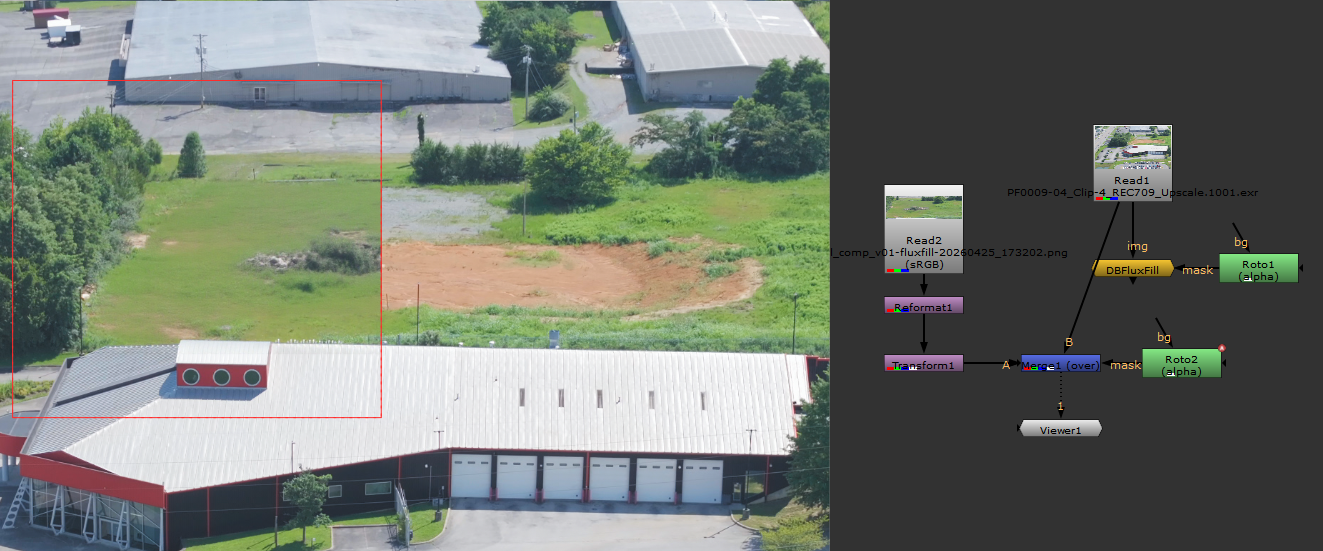
Result Read node dropped into node graph

That's what I’m trying to do with DBFluxFill. It’s a Nuke gizmo that lets you use FLUX.1 Fill Dev AI inpainting directly into your node graph. No ComfyUI, no external applications, no switching contexts. Just a node.

I built it specifically for freelance and indie compositors. The kind of people who want to use inpainting in their pipeline but may have never touched ComfyUI, don't know Python, and don't really have any interest in learning a new tool just to remove a rig from a shot. It can scale to studio use too, though I'd assume most studios already have their own systems for this.

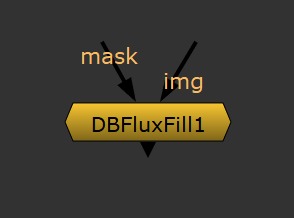
DBFluxFill in the node graph

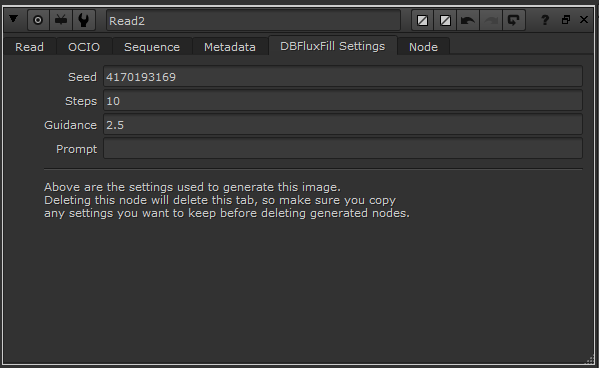
Hook up an image, hook up a mask, and hit Generate. The result drops back into the node graph as a PNG, with the seed, steps, guidance, and prompt all stored in a user tab. So your outputs are reproducible, and you know exactly what generated what.

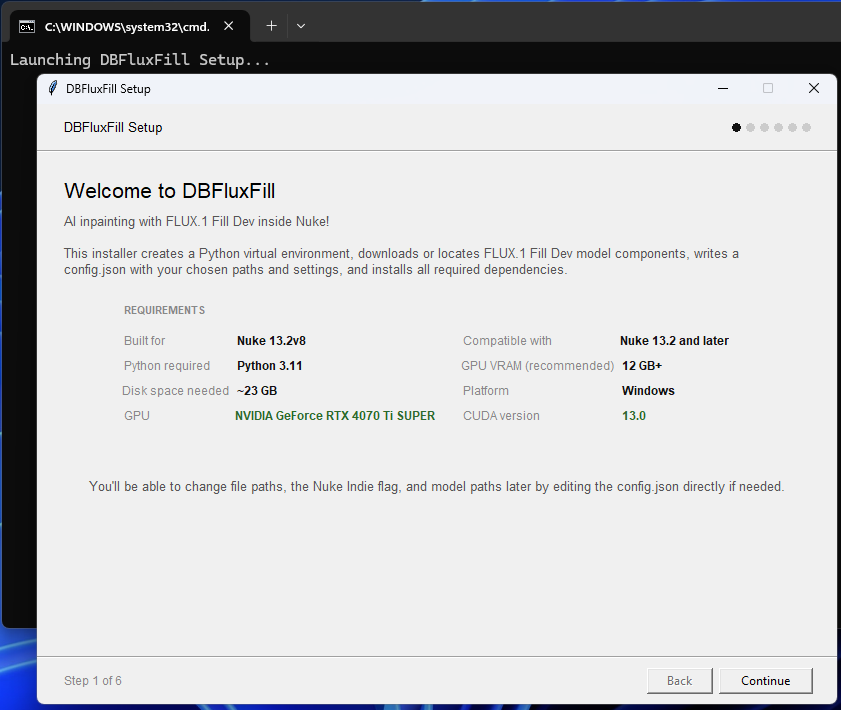
One of the big design decisions was making sure the user never had to touch a terminal to get this running. The installer handles the full Python environment setup and offers to download the models for you. Three model variants are available during install: bf16, fp8, and gguf, so the user can pick the one that fits their VRAM rather than being locked into the huge bf16 model.

The DBFluxFill installer welcome screen

The installer was built using Tkinter which made perfect sense considering the tool was so Python heavy to begin with. The installer needed to be standalone and not introduce any new dependencies, and Tkinter ships with Python. It turned out to be a great decision, even if building a multi-screen installer UI in Tkinter was frustrating on more than one occasion.

The inference runs as a subprocess in an isolated Python environment. The installer downloads and sets up a standalone Python 3.11 install separately from anything else on your system, so there's nothing to configure and nothing that interferes with existing Python installs you might have.

The downside is that Nuke freezes during generation while it waits for the subprocess to finish, and has to load the model every time “Generate” is clicked. To get around that there's a “Generate Keep Loaded” mode, which spins up a persistent process that keeps the model in VRAM between runs. Subsequent generations are significantly faster since you're not reloading the model each time.

In my testing I found that “warm” or “Keep Loaded” generations were still far slower than what I was getting from ComfyUI, but I figure the convenience of never having to open and deal with ComfyUI will be a huge plus.

DBFluxFill settings tab showing seed, steps, guidence, and prompt used

I'm comfortable in Python, but this project has a lot going on under the hood. The Nuke integration, the subprocess architecture, the HuggingFace Diffusers pipeline, a multi-screen installer UI. Which is a big reason why I used Claude (not Claude code unfortunately) for most of the project.

Working with Claude on something this big has its up and its downs. Usage limits on the free plan, context getting lost mid-conversation, having to re-explain things that were covered three messages ago. Claude also has a tendency to just run without asking where to go. A small typo and it might regenerate the entire script. Ask it a question and it'll sometimes barrel straight past it and start re-writing code. There were a ton of moments that felt like I was working with a child genius that had some intense ADHD.

There's also a certain laziness that started to be really frustrating. It constantly tried to satisfy the tool for my machine, my setup, my workflow. I was trying to build a public tool and it kept acting like I was the only person who'd ever use it. 'But for your use case...' 'On your hardware this is fine...' It was constantly trying to get my “problem” (whatever it thinks that may be even if it’s not the problem I’m trying to solve at hand) done no matter how many holes or residual problems it’d leave in it’s wake.

But I finished it! I'd never touched Tkinter before this project. I’d never touched Hugging Face Diffusers, I’d never touched subprocess architecture, but now I have! It's not how I expected to learn any of this, but I came out the other side with a finished tool and a lot more Python experience than I started with.

That said, it wasn't all Claude. Knowing what a compositor actually needs, knowing how the Nuke Python API works, knowing what the user experience should feel like, that all came from me. There was a lot of tweaking, a lot of catching mistakes in the code, a lot of pushing back when Claude didn’t understand how real compositors work. Building something like this solo would have otherwise meant months of work or a whole team. So now it’s built!

Check it out on GitHub!

InkyPi Hobbiton Clock

March 19, 2026

videoprojects

I got this really awesome Pimoroni Inky Impression 7.3" e-paper display as a Chanukah gift last year along with a Raspberry Pi Zero 2W. My goal was to use a photo I took from my trip to Hobbiton in New Zealand as the background, have the time overlay on it, while having the weather in the photo change based on the real weather in Atlanta. I loaded up InkyPi onto it, and got started.

After pushing the original photo to the display, I realized I was going to have to pivot. The e-paper refresh rate was way longer than I thought it would be, and resolution of the screen made real photos look all muddy and pixelated. So instead of displaying the full time (like 12:30), I changed it to a single number that fills in depending on how close to the next hour it is. I also generated a lino graph/block print version of the image using ChatGPT.

From there I used Flux Kontext and Qwen Edit to generate 9 different weather conditions, and 2 more versions of each for sunset/sunrise and night, totaling 27 background images. Using Flux Kontext and Qwen Edit for these was more often than not a nightmare and didn't work at all well given the style. I had to do a lot of heavy lifting in Photoshop, refining and bumping up elements along with masking and color correcting and compositing different versions with different seeds.

I then coded an InkyPi plugin in Python using the already existing "weather" and "clock" plugins as a baseline.

Lots to learn here and a ton of headaches, but I'm pretty proud of the results. Check out the video below to see it in action!

The Economy - Eagle Eyes

August 29, 2024

video

Budget green screen visual effects for a music video

2016 Show Reel

March 17, 2016

video

Featuring work from The Walking Dead and Your Pretty Face is Going to Hell

The Bench

May 16, 2014

video

My senior thesis film